
Copy Array Along Path tool...have a look.
-
Hi Bob and Pav,
I'm confused because in following my own idea I was sure to have described the process in its simplicity!! Your two comments tell enough I was wrong.
I am going to try to explain better , "pardon pour mon anglais".
I)My main idea is that we need to prepare the curve we intend to be the path along which we want to copy our elements. Because what we need is a curve made of
-a)an exact number of segments
or
-b)a curve divided by segments of a precise length.1)If we make our "path" using arc tool or/and line tool or/and bezier spline we need to make it first a "clean curve". This is made by the help of "Weld".
2)Once this is accomplish, we are going to convert this curve as a well wanted segmented polyline. this is made with underknown features which go with "BezierSpline" . When you select the curve, you can choose by right-clic context menu
 Convert to: Polyline Divider (if you wish to divide your curve by segments of exact length) or Polyline Segmentor (if you want to divide this curve by a specific number of equals segments.)
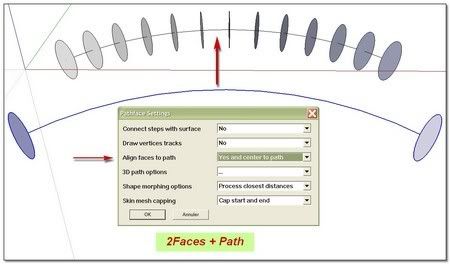
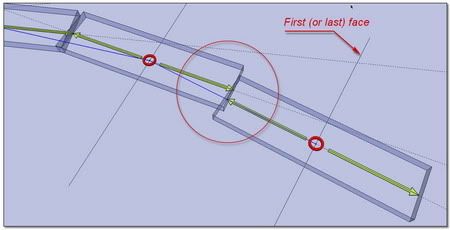
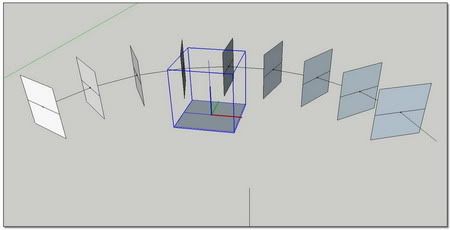
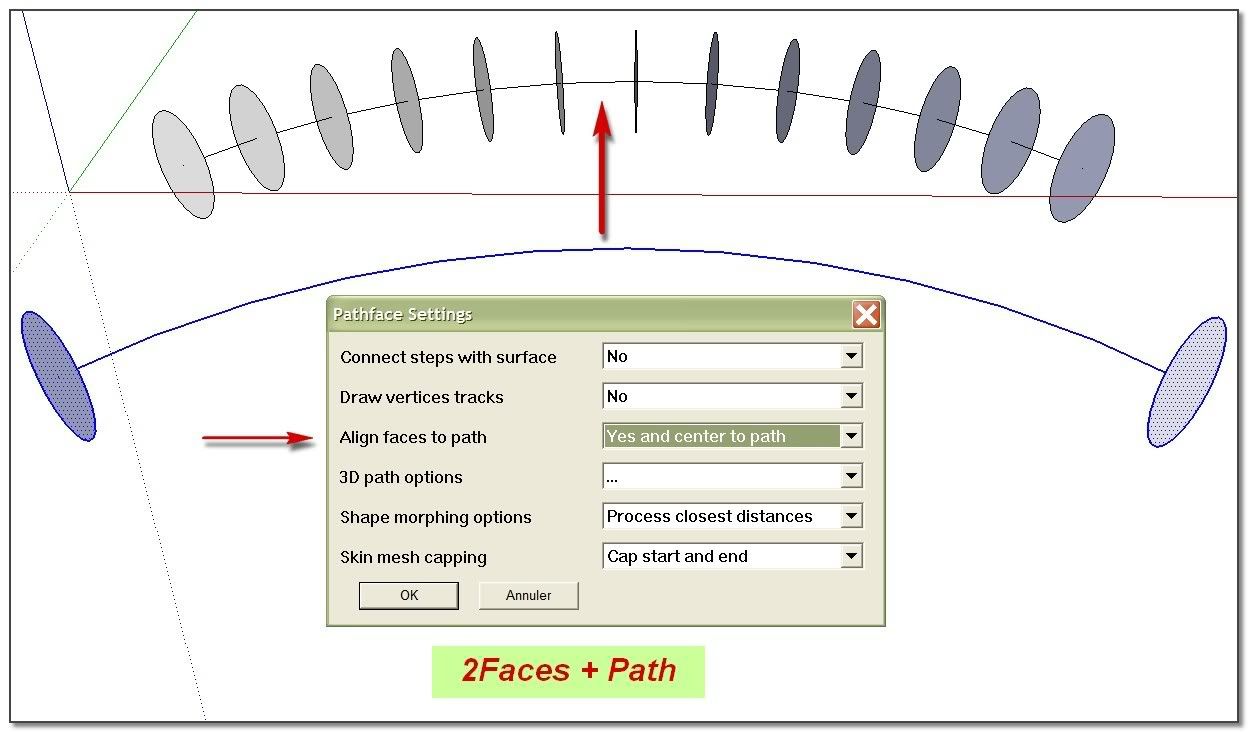
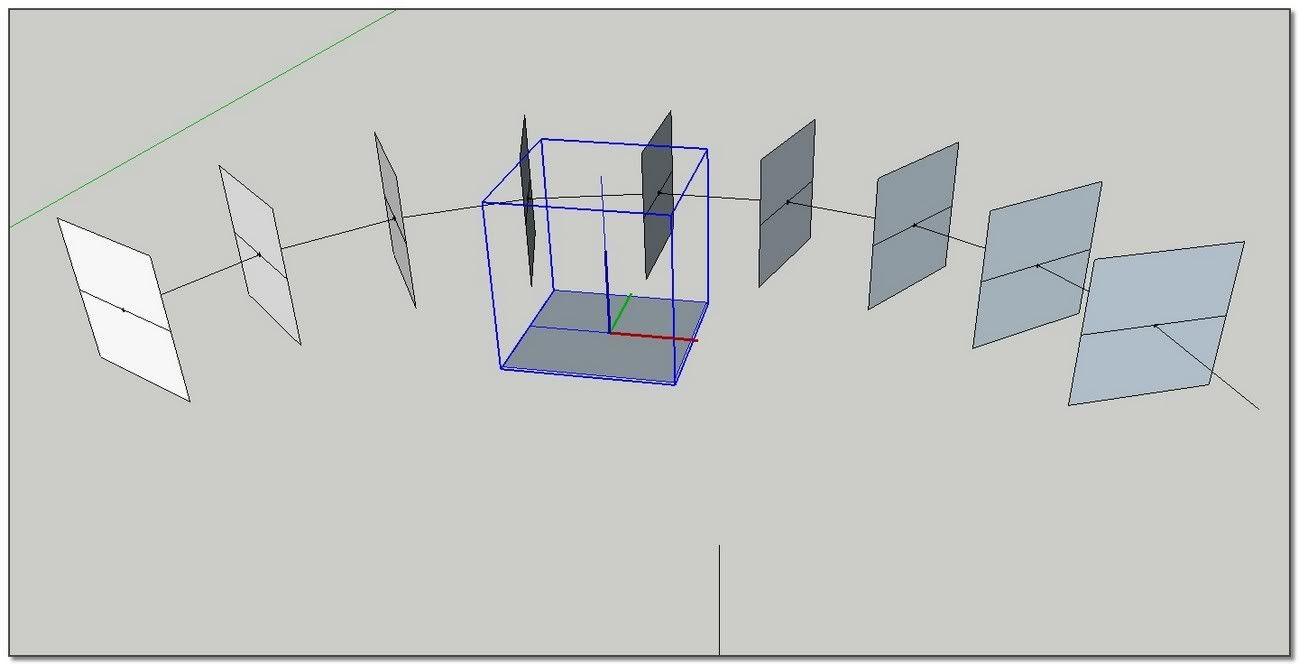
II)My second idea is to use "2Faces + Path" plugin in an unusual way. This plug is first intending to drive a transformation from a face to another one. My idea is to use it with no transformation! the first and the last face are the same! So this face is going to be dispatched in one clic all along the path in between the segments.
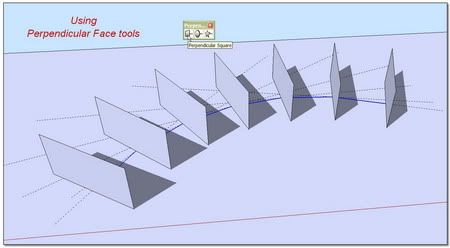
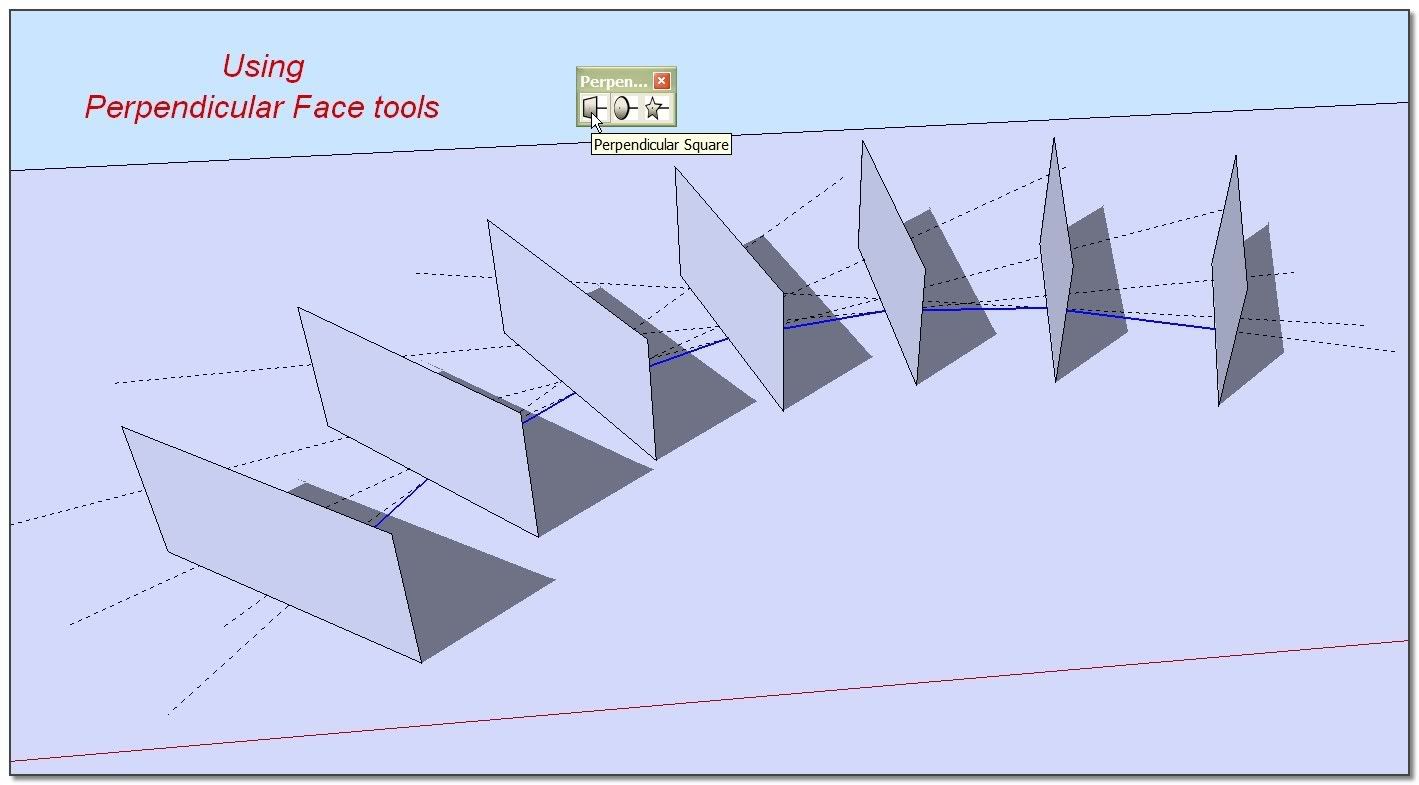
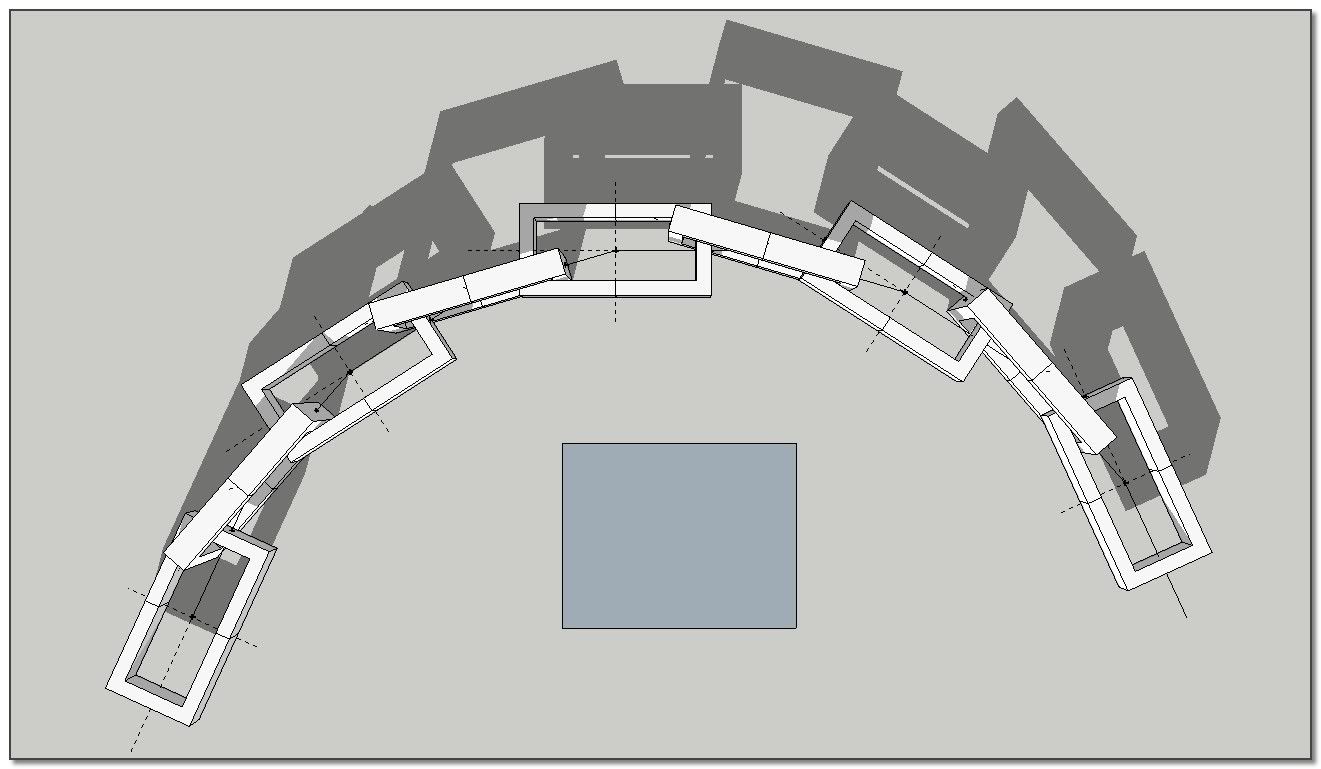
Re: to simplify the process I use "Perpendicular Face tools" to put in place with a clic those first and last faces, but we can do without it. (in particular when we want to use a complex face)III)My third idea is to use "Components onto Faces" to replace those faces by the component I want. One more time in just a clic and, as the faces remain selected, I can delete them with one push on "Del" .
Re: if I want to dispatch various components like in the case of my chain, I copy the same number of the path+faces and I delete by hand the faces I don't want to follow the component. And I assemble them at the end.
Re: the main tip is to play foxy with "modify axes" inside components.In summary:
1)drawing the curve
2)make it clean (weld)
3)make it a divided polyline (BezierSpline: Polyline Divider or Segmentor)
4)put the first an last face (Perpendicular face tools)
5)put a face at each segment intersection (2Faces + Path)
6)replace faces by components.(I have some others ideas to develop the process, I shall tell latter
 )
)simon.
-
@chris fullmer said:
Was TIG working on something that would replace a single line with a component and use the line scale and orientation to determine the scale and orientation of the component? Something about that sounds familiar...
Chris
Hi Chris,
This "Replace with Component" idea is extremely exciting. Do you think Fredo's 'GhostComp' could hold some clues on implementing this? I know zero about Ruby Scripting but use Fredo's alot to help keep things running smoothly.
I realise it needs a component to create various versions of that component and hide the original. But could this be reversed to reference a component from a simple line?
-
@unknownuser said:
a ruby called "Replace segment with Component"
If your segment is a component you don't need a ruby
I believe exist a ruby that transform a selection of elements in Components
So select your elements (here segments)
transform them in components
Replace your component by any other component you want
Et voila
-
some few more details of explanation:
When I need
@unknownuser said:-b)a curve divided by segments of a precise length.
. For I have to dispatch elements with a definite length along the path, it is going to remain an under sized segment from "Polyline Division". I delete this extra one before go further.When I use "Perpendicular Face Tools" to put a face at each end of the curve, those faces are grouped. I ungroupe them in order to make them as available faces with "2Faces + Path".
(
@pav_3j said:ah i get it now simon, thank you very much for the written explaination.
pav
thank you pav)@pav_3j said:
i think one thing you may have missed out (as i understand it) is that the amount of steps you have to take with the 2 faces and a path tool, must equal the amount you have segmented the curve by, or the faces will not end up on the end point of each line.
correct?"2Faces + Path" dispatch automatically the faces at each intersection in one pass. This is the very good point!!
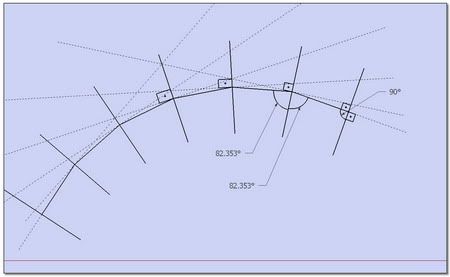
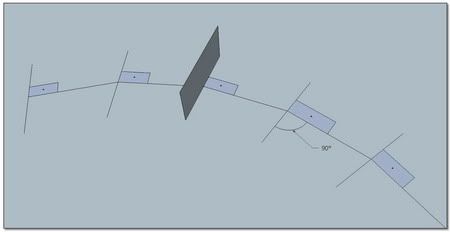
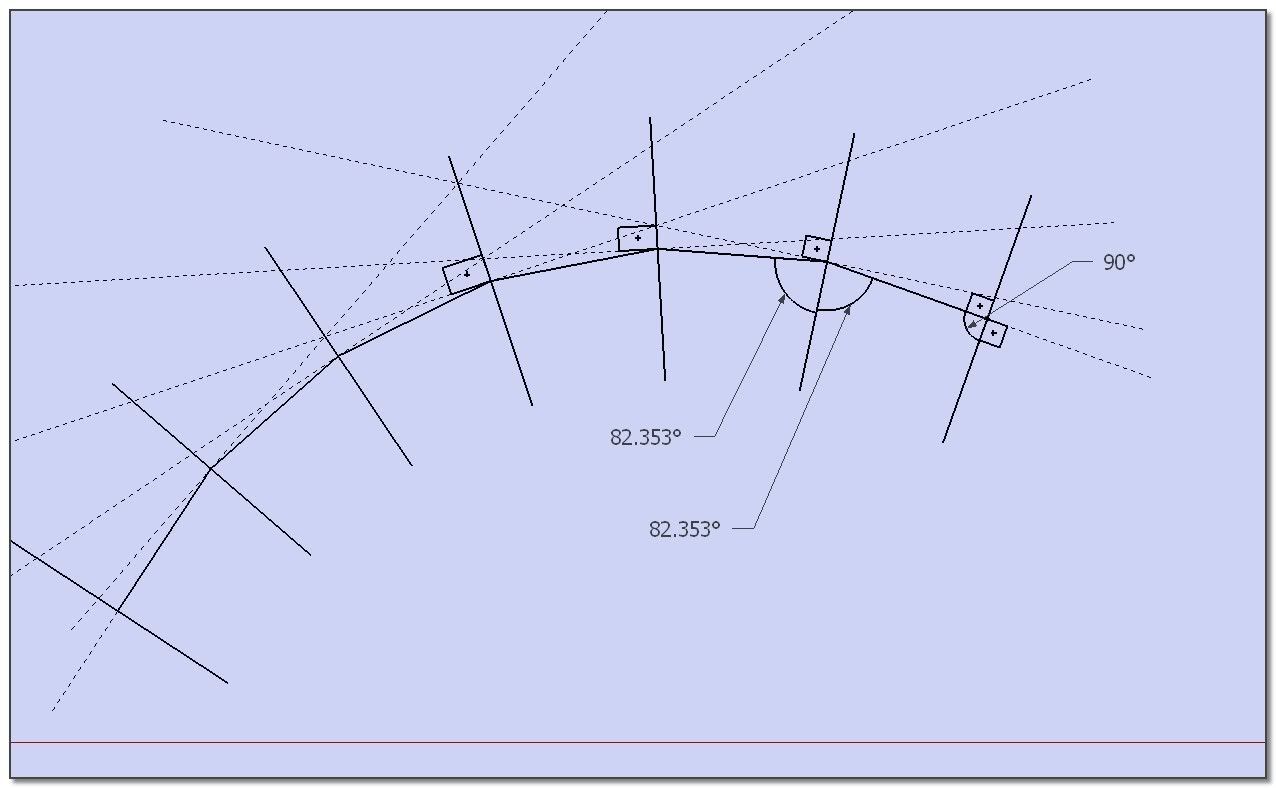
It dispatches exactly (n+1) faces: a face at each intersection + a face at two endpoints of the curve.So we have to delete the two previous faces we have put to initialize "2Faces + Path" process.
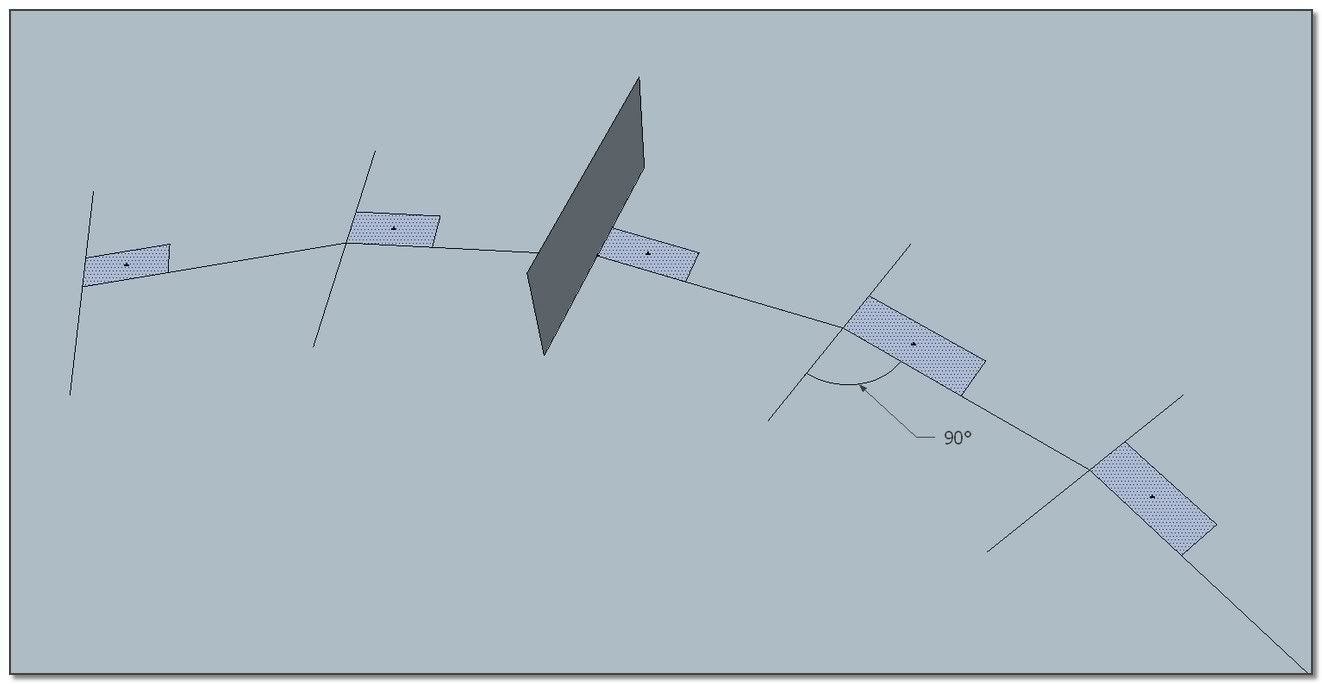
important remark: "Perpendicular Face Tools" and "2Faces + Path" doing the same, are dispatching the faces oriented at the mid angle between each two segments, and in a perpendicular angle for end lines..
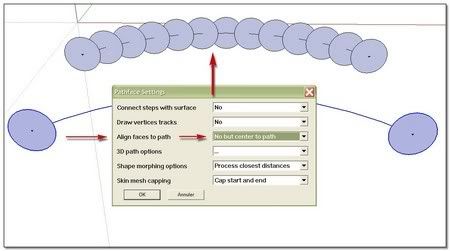
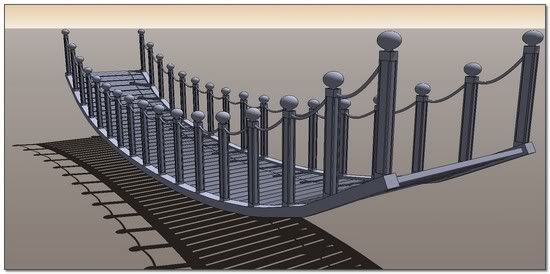
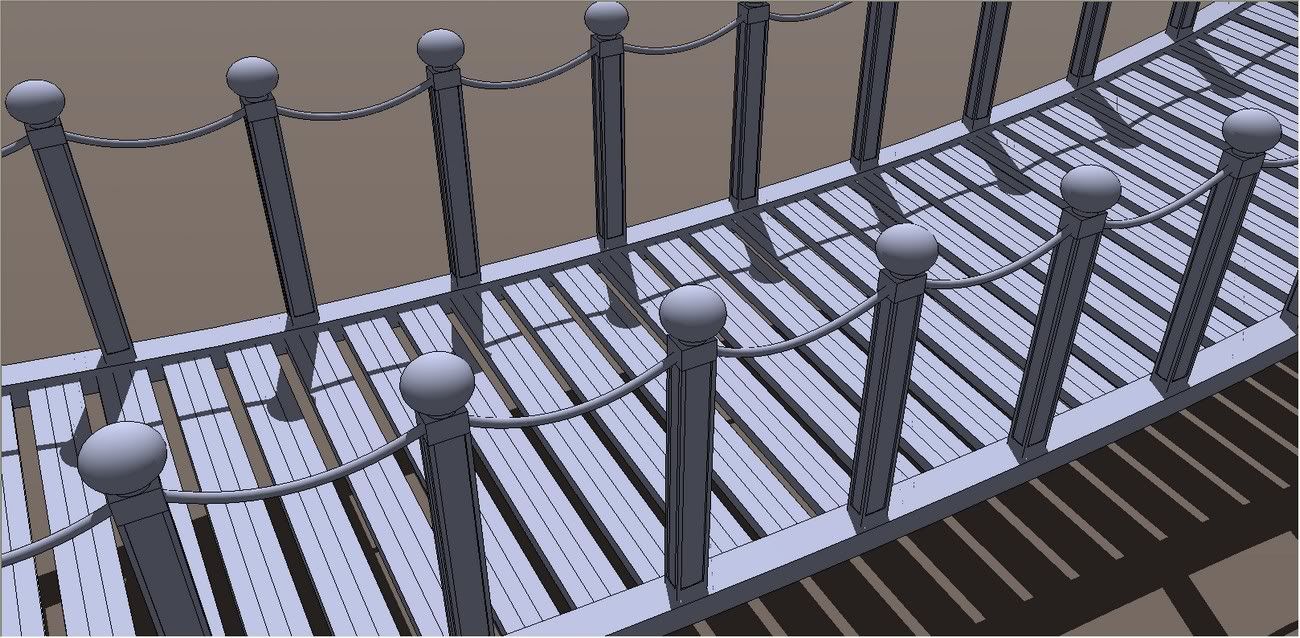
another very interesting feature is the ability of this plug to dispatch faces as they are aligned to path or not aligned to path. I will show in another post how it can be interesting to mix invariant oriented elements with elements following the path like in a barrier, a suspension bridge...
(
@click draw said:Very clever Simon....I'll be trying this for sure!
thank you man! )@click draw said:
PS: I wonder if it would be possible to have a ruby called "Replace segment with Component"...nah....I doubt that could be written
@chris fullmer said:
Was TIG working on something that would replace a single line with a component and use the line scale and orientation to determine the scale and orientation of the component?
In this case I think that orienting a face is an easiest way than orienting a line !?
*simon
-
Should try that with Remus' catenary curve...
-
Thank you Simon: I can really understand the process now.
However, you and I have a different definition of "fast and easy".
-
@thomthom said:
Should try that with Remus' catenary curve...
[plugin]Simple Catenary Curve
../ this is done.
(I will explain latter-- 'm tired)

Have a good night SCF fellows *s
-
Anyone care to figure out what I am doing wrong. Not quite sure the proper setting for the axis on the component...See attached.
Thanks,
Jeff

-
That is great! I believe I understand. Basically, position the axis in the center so that the front and back end pivot at the same angle. I assume you just have the adjust the first and last component so they line up properly? Thanks again. I'll try it again. Merci Simon!
Cheers,
Jeff
-
And drawing inspiration from this thread, I just wrote a quick little script called component stringer. You can download it here:
http://forums.sketchucation.com/viewtopic.php?f=180&t=23616
It does essentially what Simon is showing.
Chris
-
Hi Jeff (big work had taken me out of reply)
Thank you for trying. It is interesting because it shows me what I have to explain further (but it's a "WorkInProgress" also to me!
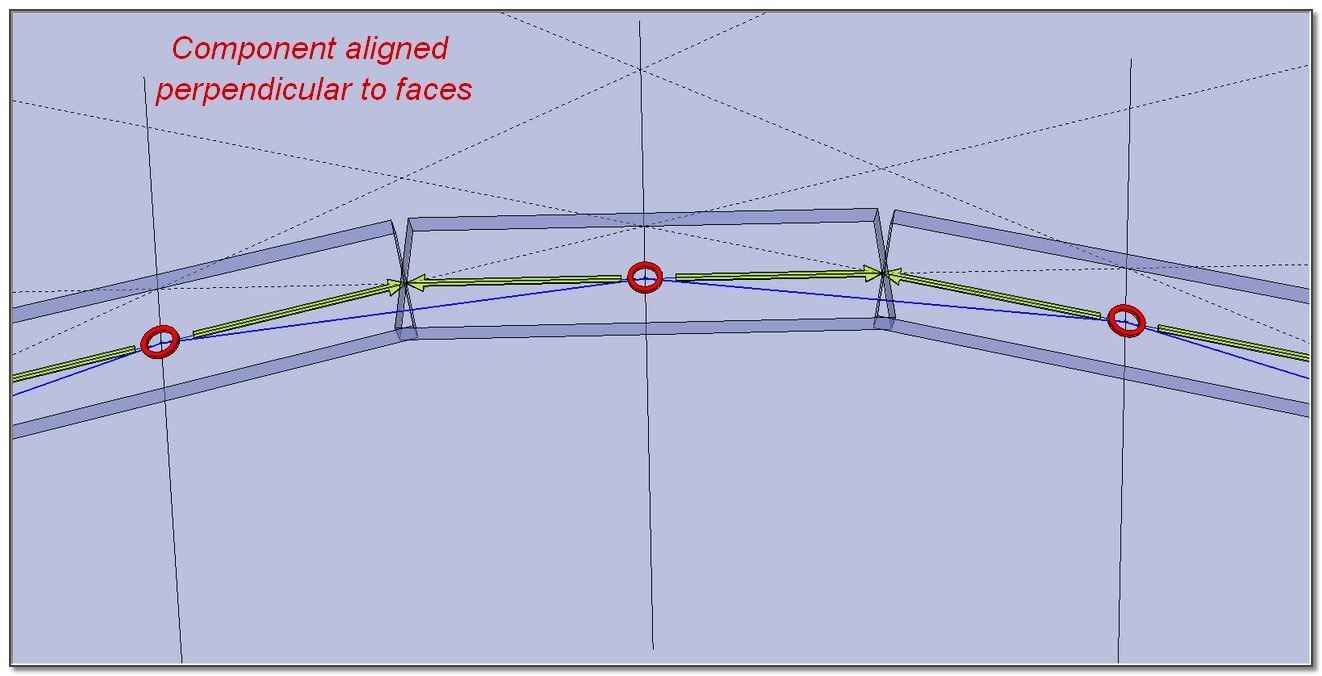
).The very basic theory to understand is that our components are not aligned to segments of the curve but are drop on faces (perpendicularly ).
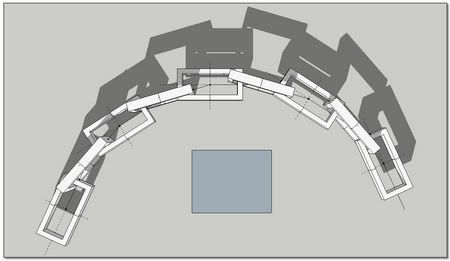
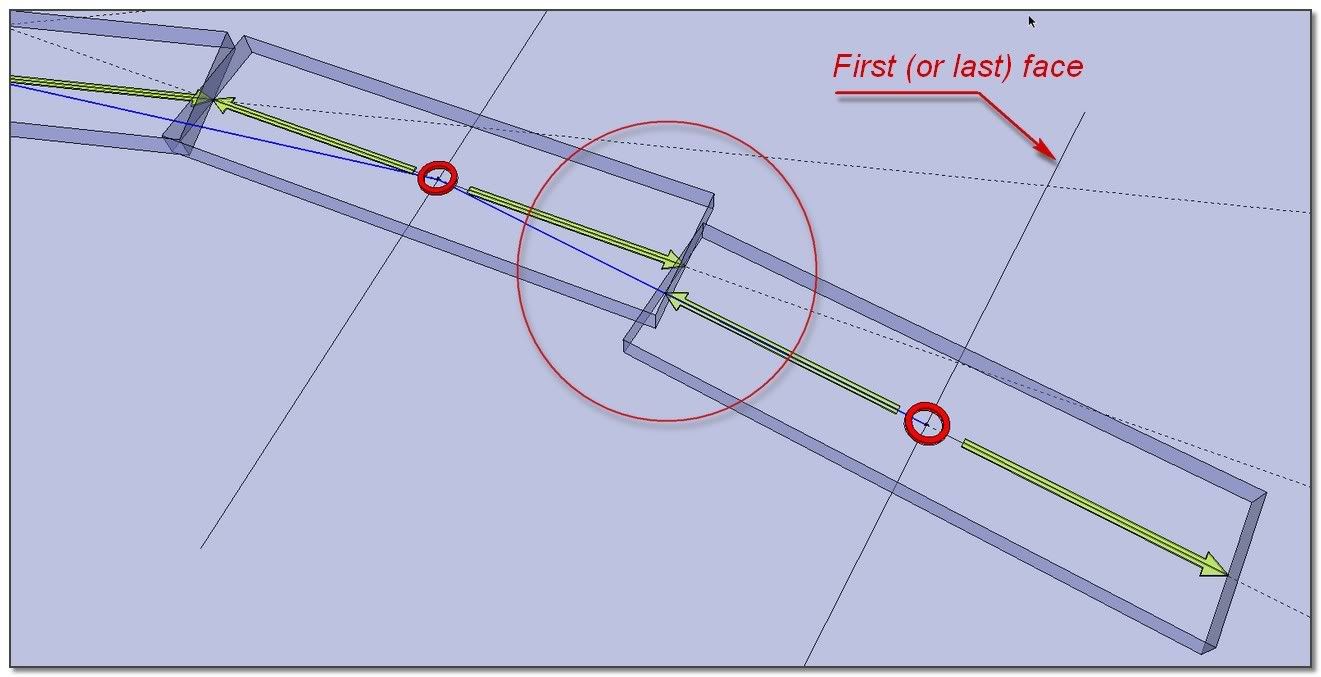
You have focused an important point: the first and last faces are perpendicular to first and last segment of the curve. So they represent a particular case. If we want a very precise result, we have to realign them with the same angle of the others
Second thing important to understand in doing this way: The process remain aproximativ . Not depending of the variations of the curve, the welding is "à peu près"!!

Your component was empty from axes and significant Construction Points. I have added them.
Your are right. The position of component's axes is absolutely fundamental. the good origin is pointed to be positioned on the apex of the triangles(?english~~)


Your curve, your component, your chain!
simon. -
Thank you, Chris!

-
Hi Chris,
It's a great pleasure to discover that you were looking apart silently and suddenly come to drop a top cool tool! Component Stringer
You have decided to make the components follows the lines rather than faces.
@chris fullmer said:
Was TIG working on something that would replace a single line with a component and use the line scale and orientation to determine the scale and orientation of the component? Something about that sounds familiar...
Chris
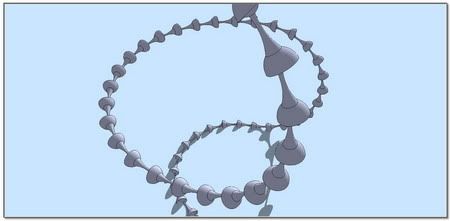
The result is that this tool is wonderful for necklaces
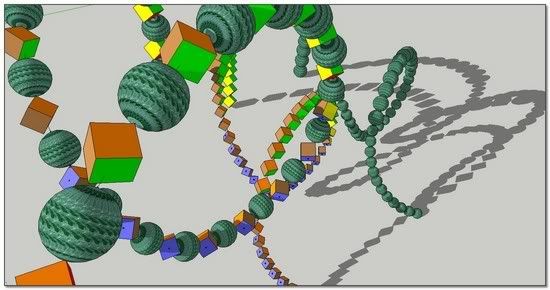
And we have not to use it for imbricated components
One more time, many thanks to you dear Chris,
*simon
-
So, Jeff, how is that SketchUp model of Doc Ock coming along?

-
Hey Miguel,
I might be able to do the arms now but I'll still suck at modeling Doc Oc. I need to put way more hours in to organic shape modeling!!!

Hope everyones weekend is going well....
Cheers,
Jeff
-
Have you tried importing a Make Human model into Wings 3D or Silo and tweaking there? Then you can import the Wings 3D model to SU and add the robotic arms.
-
I'll for sure check those out, thank you. I would still like to get decent at organic in Sketchup though. Here is a quick try at Chris's new ruby. I love it! Nice to be able to edit the component and see it update instantly. Thanks again Chris!
Jeff

-
I pursue the study of my proceeding despite Chris's "Component Stringer" because for the moment(But Chris is working to the speed of the iron horse!!), I think I can master better -the welding of components imbricated, -the mix of various components along the path, _the mix of components following the path with components invariant in orientation.
@bob james said:
However, you and I have a different definition of "fast and easy".
Here is a realtime video (no editing) to show how fast is the process.
We start with a curve and a component.
*simon
-
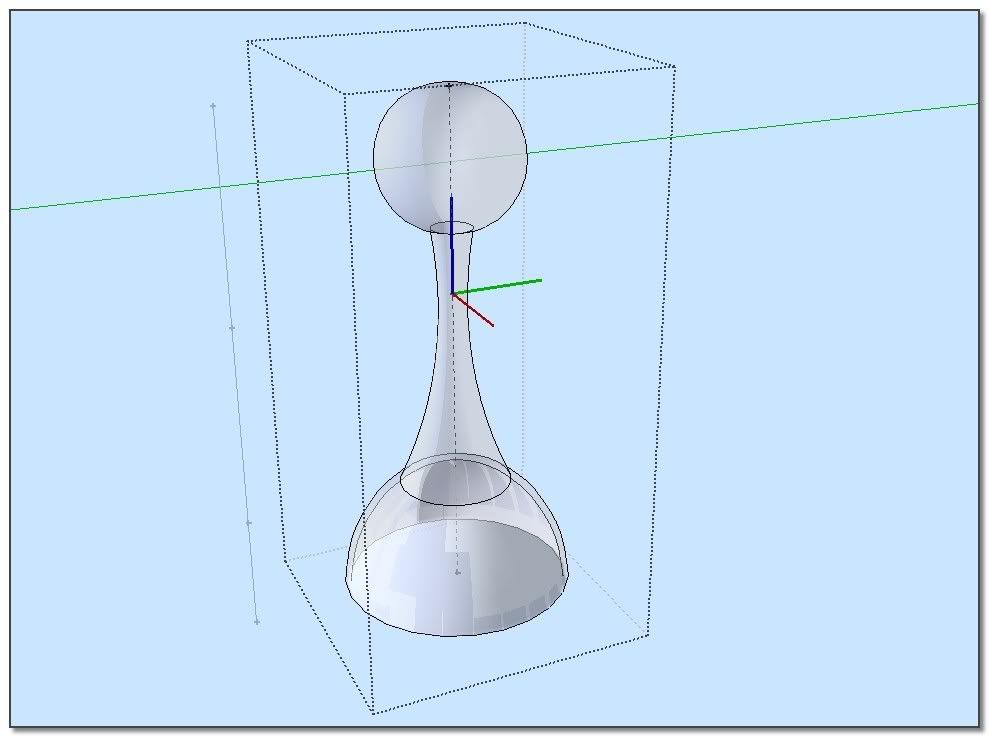
Some help to produce the component to copy along a path.
I)Put the good axes:
If it is for you like for me
 , positionning axes of the component I want to copy along a path is not so evident.
So, make a cube, make it as a component, and......
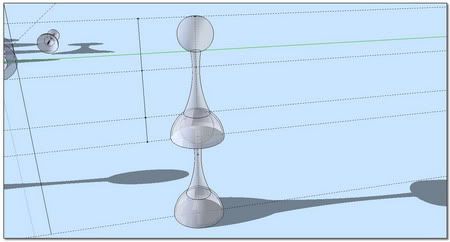
[flash=500,405:284ps2pd]http://www.youtube.com/v/z81CNzCE4V0[/flash:284ps2pd]II)How to conceive a chain link:
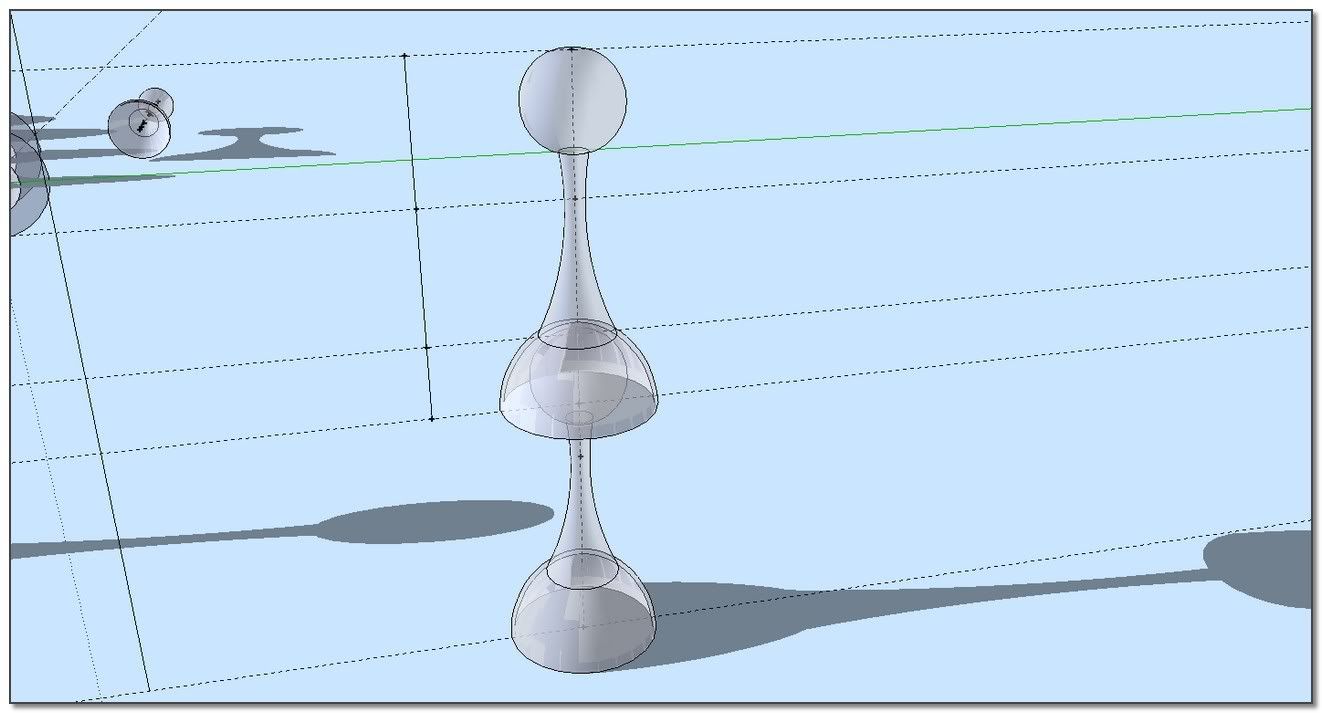
Using one or other method to produce a chain, necklace and many others fences and so on, you will need to think about the shape of the links.
Here is my tip. Just think to draw a portion of curve with the smallest radius you think you are going to use for your path...
[flash=500,405:284ps2pd]http://www.youtube.com/v/PG8aK7fC2LA[/flash:284ps2pd]:wink: simon -
Hi,
Can anyone help me how to download the ruby. It's my first visit to the forum ...
Thanks,
YiannosH


Advertisement